
Are you tired of buying expensive school bags every year for your kids? Do you want to save money and create a unique, personalized bag that your child will love? Then why not make a school bag at home? Making a school bag at home is easier than you think and can be a fun DIY project for you and your child. In this article, we will guide you through the process of making a school bag at home from scratch.
Making a school bag at home is a great way to get creative and save money at the same time. With a few basic materials and some sewing skills, you can create a personalized school bag that reflects your unique style and personality. Here is a step-by-step guide on how to make a school bag at home.
First, gather your materials. You will need fabric, thread, a sewing machine, scissors, a ruler, a pencil, and any additional embellishments you want to add to your bag, such as buttons or patches. Choose a durable fabric that will hold up to daily use, such as canvas or denim.
Next, decide on the size and shape of your bag. You can create a basic tote bag shape, or get more creative with a backpack or messenger bag design. Use your ruler and pencil to sketch out the dimensions of your bag on your fabric.
Once you have your fabric cut to size, it’s time to start sewing. Begin by sewing the sides and bottom of your bag together, leaving the top open. Reinforce the seams with additional stitching to ensure the bag can hold the weight of books and other school supplies.

Materials Needed
Before we start, let’s gather the materials we will need for this project. Here is a list of items you will need to make a school bag at home:
- Fabric (preferably a sturdy fabric like canvas or denim)
- Sewing machine
- Thread
- Scissors
- Pins
- Measuring tape
- Webbing or ribbon (for straps)
- Buckles (optional)
- Zipper (optional)
- Interfacing (optional)
Now that you have your materials ready, let’s move on to the step-by-step process of making a school bag at home.
Step 1: Choosing the Fabric
The fabric you choose for your school bag should be sturdy enough to withstand the weight of books and other essentials. Consider using canvas, denim, or a heavy-duty synthetic fabric. Select a fabric that reflects your personal style and ensures durability.
Step 2: Measuring and Cutting the Pieces
Measure and mark the dimensions of your bag on the fabric, keeping in mind the desired size and shape. Use a ruler or measuring tape to ensure accuracy. Once marked, carefully cut out the pieces using sharp scissors. These pieces typically include the front and back panels, side panels, bottom panel, and any additional pockets or compartments.
Step 3: Sewing the Main Body
Begin by sewing the side panels to the front and back panels. Use pins to hold the pieces together, and then stitch along the edges, leaving the top open. This will create the main body of the bag.
Step 4: Adding Pockets and Compartments
If you want your school bag to have pockets or compartments for organization, now is the time to add them. Cut out the desired shapes from the fabric and sew them onto the inside or outside of the bag. Pockets can be attached to the sides, front, or even the interior of the bag.
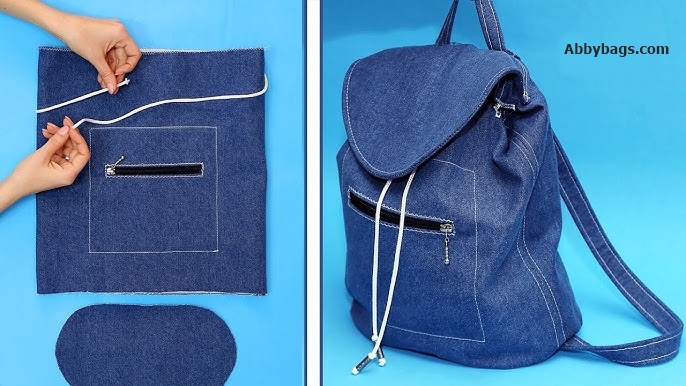
Step 5: Attaching the Straps
To ensure the bag is comfortable to carry, attach sturdy straps or webbing to the top edges of the side panels. Measure the desired strap length and sew them securely in place. Reinforce the stitching to provide additional strength.
Step 6: Adding Closure
Decide on the type of closure you want for your bag. It can be a zipper, magnetic snap, buttons, or even a drawstring. Follow the appropriate steps for attaching the chosen closure securely.
Step 7: Finishing Touches
Inspect the bag for any loose threads or uneven seams. Trim the excess threads and press the bag with an iron to give it a polished look. You can also add embellishments like patches, buttons, or embroidery to personalize your creation.
Tips for Making a School Bag at Home
- If you are new to sewing, start with a simple design.
- Don’t be afraid to experiment with different fabrics and colors.
- Make sure to reinforce the seams to make your bag sturdier.
- If you don’t have a sewing machine, you can sew the bag by hand.

Conclusion
Making a school bag at home is a fun and rewarding DIY project that can save you money and give you a personalized bag that your child will love. With the right materials and a little bit of sewing know-how, you can create a beautiful and sturdy bag that will last for years. So why not give it a try?
FAQs
Do I need a sewing machine to make a school bag at home?
A: While a sewing machine can make the process faster and easier, you can still make a school bag by hand.
What kind of fabric is best for making a school bag?
A: A sturdy fabric like canvas or denim is best for making a school bag that can withstand the weight of books and other school supplies.
Can I personalize my school bag?
A: Absolutely! You can choose any fabric and color you like and add personal touches like patches or embroidery.
Is it difficult to make a school bag at home?
A: It depends on your level of sewing experience, but with the right materials and a little bit of patience, making a school bag at home can be a fun and easy project.
How long does it take to make a school bag at home?
A: The time it takes to make a school bag at home will depend on the complexity of the design and your sewing experience. However, it should take a few hours at most.
Ameer Hamza is a dedicated fashion writer with a keen eye for emerging trends and a passion for the artistry of style. His work delves into the latest in fashion, offering readers insights on everything from runway-inspired looks to everyday elegance. With a flair for storytelling and a deep understanding of the industry, Ameer Hamza brings a fresh perspective, making high fashion accessible and inspiring to all. Follow along as he explores the intersection of creativity, culture, and couture in the ever-evolving world of fashion.
