
Patches are a fantastic option for personalizing your backpack and giving it a unique touch. Adding a patch allows you to express your personality and makes your backpack stand out from the crowd. If you’re wondering how to put a patch on a backpack, this step-by-step guide will walk you through the process and help you achieve a stylish and customized look.
Gathering Materials
Before you start attaching a patch to your backpack, you’ll need to gather a few materials:
- Backpack: Select a backpack that you want to decorate with a patch. Ensure the fabric is suitable for attaching patches.
- Patch: Choose a patch that represents your interests or matches your style.
- Thread and Needle: Opt for a thread color that complements the patch and a strong needle to stitch through the backpack fabric.
Preparing the Backpack
To ensure a smooth patch application, follow these preparation steps:
- Clean the backpack: Wipe down the area where you intend to attach the patch using a damp cloth to remove dust or dirt.
- Smooth out the fabric: Iron the area to eliminate wrinkles and create a flat surface for the patch.
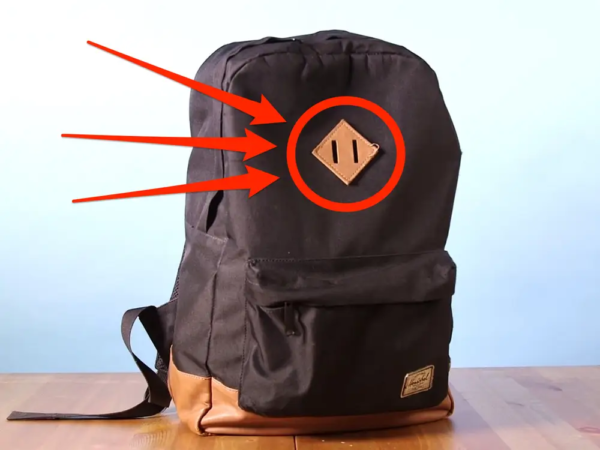
Choosing the Right Placement
Deciding where to place the patch is essential to achieve the desired visual impact. Consider the following factors:
- Visibility: Choose a spot that allows the patch to be easily seen, such as the front or top section of the backpack.
- Flat Surface: Ensure the area you select is relatively flat to facilitate smooth attachment.
- Balance: Aim for a balanced look by placing the patch symmetrically or off-center for a more dynamic appearance.
Attaching the Patch
Follow these steps to attach the patch to your backpack:
- Position the patch: Place the patch on the selected spot and hold it in place using pins or fabric-friendly adhesive.
- Thread the needle: Thread your needle with a double thread, tying a knot at the end.
- Begin stitching: Insert the needle from the inside of the backpack, bringing it through the patch’s edge. Create small, even stitches along the patch’s perimeter, ensuring it remains securely attached to the fabric.
- Knot the thread: Once you have stitched around the entire patch, make a final knot on the inside of the backpack to secure the thread. Trim any excess thread.
Securing the Patch
To reinforce the patch and enhance its longevity, consider the following methods:
- Iron-on adhesive: If the patch has an adhesive backing, apply heat using an iron to activate the adhesive and ensure a stronger bond.
- Fabric glue: Apply fabric glue to the back of the patch, following the manufacturer’s instructions. Press the patch firmly against the backpack and allow it to dry completely.
Adding Personal Touches
Once you have attached the patch, you can further personalize your backpack by adding additional embellishments:
- Embroidery: Enhance the patch with embroidery thread by adding extra details or outlining the design.
- Buttons or studs: Attach buttons or studs around the patch to create a unique and eye-catching effect.
- Beads or sequins: Sew beads or sequins onto the patch or backpack to add sparkle and dimension.
Maintaining the Patch
To keep your patch looking its best and ensure its longevity, follow these maintenance tips:
- Gentle handwashing: When cleaning your backpack, gently handwash the area around the patch using mild detergent and cold water.
- Air drying: Allow the backpack to air dry naturally after washing, avoiding direct sunlight or heat sources that may damage the patch.
- Avoid excessive friction: Be mindful of rough surfaces or abrasive materials that could rub against the patch and cause damage.
Conclusion
Adding a patch to your backpack is a creative and fun way to showcase your style. Following the steps outlined in this guide, you can confidently attach a patch to your backpack and enjoy a customized look that reflects your unique personality. Express yourself through patches and transform your backpack into a stylish accessory that stands out.
FAQs
Q: Can I remove the patch once it’s attached?
A: Yes, you can remove the patch; however, it may leave behind residue or cause damage to the fabric, depending on the attachment method used.
Q: Can I attach multiple patches to my backpack?
A: Absolutely! You can attach multiple patches to your backpack to create a collage or tell a story through different designs.
Q: How can I ensure the patch stays in place over time?
A: To ensure the patch stays securely attached, consider reinforcing it with additional stitches or fabric glue for extra durability.
Q: Can I attach patches made of different materials to backpacks?
A: Yes, patches can be attached to various materials, such as canvas, denim, nylon, or leather, as long as the attachment method is appropriate for the fabric.
Q: Can I attach a patch to a backpack with a zipper or pockets?
A: Yes, you can attach a patch to a backpack with zippers or pockets. Choose a spot that doesn’t interfere with the functionality of these features.
Ameer Hamza is a dedicated fashion writer with a keen eye for emerging trends and a passion for the artistry of style. His work delves into the latest in fashion, offering readers insights on everything from runway-inspired looks to everyday elegance. With a flair for storytelling and a deep understanding of the industry, Ameer Hamza brings a fresh perspective, making high fashion accessible and inspiring to all. Follow along as he explores the intersection of creativity, culture, and couture in the ever-evolving world of fashion.
